We all remember those frustrating times when you need to smoke hash or weed but find yourself stuck with no papers, or smoking accessories. Or when you`re with your buddies at the cottage and feel like building something cool to get super baked with your stash of hash. Here is a simple guide on how to smoke hash by making a pipe out of an everyday pop or beer can and with items that are laying around the house.
Step 1 – How to Make a Pipe – Find a Soda or Beer Can
Go rummage around in the recycling bin and grab a pull-tab aluminum can. A typical 12 oz soda can or beer can will work fine, as well as a larger “tallboy” style can. I prefer the tallboy can because it provides more distance from your face and it`s easier to shape.
Make sure to rinse it out first with hot tap water and let it dry before continuing on to Step 2.
Step 2 – Make an Indentation to Shape Your Weed Pipe
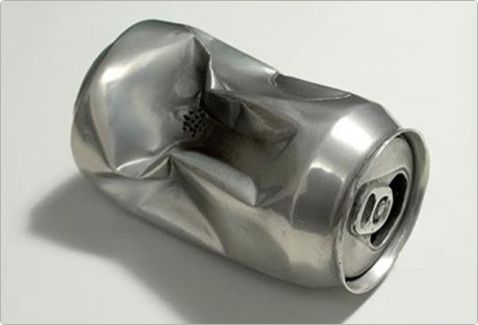
Use your 2 thumbs to make an indentation on side of the can. Shape it the best you can so the indentation is as flat as possible.
Make the indentation on the opposite side of the mouth of the can.

A perfect example of how to make a weed pipe indentation.
Step 3 – Get a Sharp Pointy Object to Make Your Holes
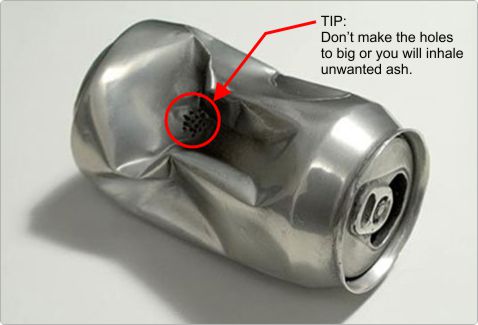
Look around the house or cottage and find a sharp pointy object. Ideally, a large pin works well, a pen can work too, as well as any pointy small screwdriver like the ones used for eye glasses. An effective hole-poker is your mission here.
Make holes in the center of the indentation that you made in Step 2. Make between 16 to 24 small holes in a grate like pattern (the more holes the better).
- If nothing is available to help make your weed pipe holes, consider finding a sturdy twig or a piece of wood with a point to help create a series of small holes.

Step 4 – How to Make a Pipe – Make Your Ventilation (Carb) Hole
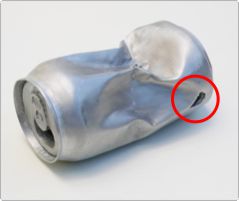
Poke a large hole on the side of your new weed pipe to act as a ventilation hole or carburetor. Do a test dry run and choose a location for the hole that feels most natural to you. The idea here is that you want to cover the hole with your finger or thumb as you light your weed and inhale. You then release your finger to open up the hole to allow all that dank smoke rush into your lungs at once.
You can use a sharpened pencil, a pen, or a pointy screwdriver… to create the ventilation hole.

TIP – Do a dry test run to help locate the perfect spot on your weed pipe.
Step 5 – Remove the Tab off the Can
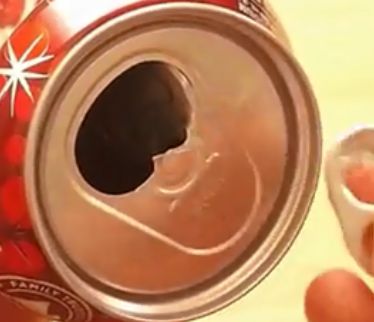
When making and using your new weed pipe, you want it to be unrestricted with good air flow for optimum smoking effectiveness. Removing the tab off the can helps with this and is important.

TIP: Please flatten or remove any sharp edges that are left on the mouth hole after you remove the tab, you don’t want anyone to cut their lip.
Step 6 – How to Condition your new Weed Pipe
You need to condition your weed pipe by heating the smoking area and the surrounding area of the can. This will vaporize and burn off the chemicals used to coat the can before you start blazing. You can use your lighter, or a butane torch (like the one you use for dabbing) or even a BBQ lighter.
If you use a propane torch, be careful to not melt your beautiful new pipe and burn your fingers. Keep the flame a good distance away and slowly bring it in closer to burn of the unwanted chemicals, it won’t take much to get the job done.
You can also sand off or scrape off the paint in the smoking area, this removes a large part of the potentially harmful material that might be vaporized as you smoke.
Step 7 – Smoke it up!
To smoke, place your weed or hash on the indentation, hold you mouth to the drinking hole in the can, and cover the carb with your thumb. Light the weed and inhale at the same time to fill the can with smoke, then remove the lighter and then your thumb to open the carb when you’re ready to inhale.
Using a homemade weed pipe tips and tricks.
- Don’t grind up your marijuana to fine for the pipe, it’s best to break off small little nugs.
- Make sure to not break up your hash too fine, or you may risk inhaling it. It’s best to place the hash on a bed of weed or dry herbs to reduce the risk of inhaling hash heaters.
- Try some shatter with your new pipe. Roll a piece of shatter in your fingers and break off small bits and place them on a bed of cannabis or dry herbs. “You have to cough to get OFF!”
Understand the Health Risks
Heating and inhaling aluminum has been linked to Alzheimer’s and other neurological diseases. Although, it’s difficult to heat aluminum to a high enough vaporization point using a simple Bic lighter but it’s not recommended.
- The basic principle of the can pipe can also be transferred to a number of other household things like fruits or vegetables with hard flesh that don’t have the harmful potential for side-effects.
Smoke at your own risk and be safe.
Conclusion
Thanks for checking out my guide on how to make a hash pipe. During my high school daze, I used to smoke the best hash with these types of pipes all the time with my friends. We had a blast making them and using them with our hash, but we always chucked them after our smoking session, they were never reused. The health risks are real, if you decide to make a pipe and use it, please just try it out and don’t make the can pipe your regular smoking device. There are superior methods out there to smoke or vape.
Cheers,
The Chronic Beaver

